
How to Download and Install Android M on Your Nexus Device


What's This?
how-to-install-android-m-nexus-
From the stage of Google I/O 2015, the technology company announced the latest version of world’s most popular mobile operating system i.e. Android M. While the final release date of Android M is miles away, Google has released the developer preview of Android M.
If you own a Google Nexus 5, Nexus 6, Nexus 9 or Nexus Player, you can download the preview today and install the build on your device.
Note:
This is a raw build of Android M and it’s bound to have some bugs that will be addressed by Google later as the testing phase proceeds. So fossBytes advises you to install the Android M Developer Preview on a device which isn’t of your daily use. Make sure to make a complete a backup of your devices.
Recommended: Biggest Improvements and New Features in Android M

How to download and install Android M?

  1. Download and install the latest Android Studio Preview on your Windows machine as it will install Fastboot and ADB tools. You can access them using the command terminal on your computer.
  2. Now you need to add the SDK folder and specify its path using the steps below:
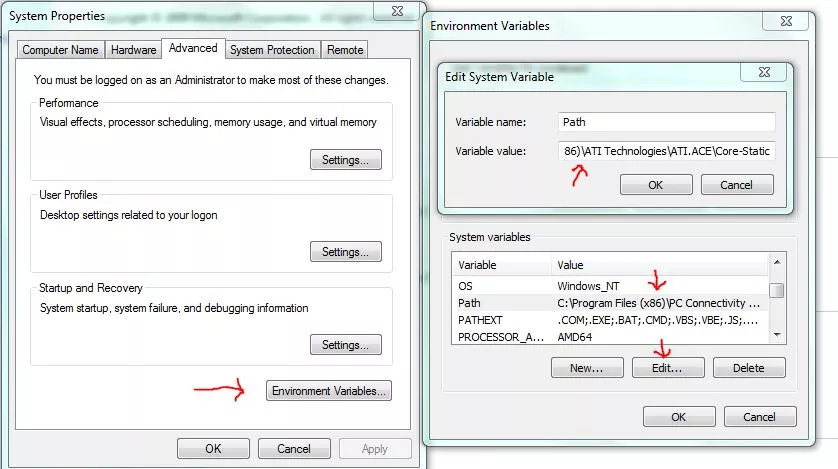
  3. In your PC, right click on My Computer and go to Properties.
  4. Go to Advanced System Settings followed by System Properties > Advanced > Environment Variables.how-to-install-android-m
  5. In the Environment Variables window, select Path and click on Edit. Type the name of directory path where the SDK is installed. Don’t forget to add semicolon separating the entries.
  6. Now enable the USB debugging on your system. Go to Settings > About Phone > Software information. Enable it by tapping the Build Number seven times.
  7. Go to Settings > Developer options and select USB debugging.
  8. Now download the Android M factory images for your device from the links given below:
  1. Now it’s time to extract the downloaded Android M archive.
  2. Connect the device using the USB connection.
  3. Start your device in fastboot mode. This could be done easily while pressing a key combination while the device powers up. Know about them here.
Another way to fastboot your device is to use ADB tool. With the device connected, execute this command using command terminal: adb reboot bootloader
If there are some issues with device’s bootloader, unlock it using this command in terminal: fastboot oem unlock
Now we’ll install the Android M developer preview on Nexus:
  1. Find the unzipped Android M factory image by opening a command terminal.
  2. Now execute flash-all.bat which could be found in the extracted image.
  3. For security purposes, Google advises to lock the bootloader by this command: fastboot oem lock
Now Android M preview is installed on your Nexus device. Your device will get monthly over-the-air updates.
To uninstall Android M preview and go back to the previous Android version, download the factory images from this page and repeat the above steps. Don’t forget to clear the files from Fastboot and ADB that were added earlier.

Comments

Popular posts from this blog

The Best Web Hosting Services

Are you looking for the best web  hosting  services for your needs? Whether you need a place to host your small personal blog or a major corporate website, the following list will help you identify the best hosts to use. Finding the best web hosting service isn’t quite as straightforward as searching Google and choosing the one with the lowest price. There are a lot of issues to consider, including the reasons for  why  you need hosting and  how  you intend to use it. Once you have a handle on that, finding the right host becomes much easier. Choose one that’s undersized and you’ll end up with website outages and slow page loads, but choose one that’s oversized and you’ll be throwing money away. Defining Your Web Hosting Needs Before choosing your web host, you’ll need to think about your requirements. Consider the following concerns and decide the importance of each item on a scale of 0 to 10 (with 0 being not at all important and 10 being critically important): Speed  — H

Google Photos can now stabilize all your shaky phone camera video

G oogle Photos is where all my photos are. Long ago I was a man of SmugMug, and then Flickr, and then at some point spent days and days copying years of images to iCloud Photo Library before eventually disregarding that and switching to Google. What can I say? I’m a simple person who can be easily delighted and swayed by automatic GIF creation and reliable backups. And Google Photos keeps getting better. Here’s the latest example: now the mobile app can automatically stabilize videos in your camera roll with a tap. A lot of flagship smartphones offer optical image stabilization when shooting video, a hardware feature that helps keep footage smooth. Others, like Google’s Pixel, use software to try and stabilize jerky movements. Putting stabilization inside the Google Photos app could enhance results further if you’re already working with hardware OIS, or improve recordings significantly if your phone lacks any means of steadying things out of the box. The stabilized video is croppe