Android App Development – A Blessing For Diversified Business Needs
How To Run WhatsApp On Your Desktop Computer?
WhatsApp is a really cool messaging app that lets you send messages and chat with your buddies
absolutely free of charge! It is the most popular messaging app for
Android and iOS smartphones, and rightly so! It connects people from
around the world. But the problem is, it's only made for smartphones.
You can't use it well on older/feature phones.
And even if you do own a smartphone, it drains away your precious
battery time, since it needs internet connectivity to do its thing. Well
if you're like me and don't want to let battery timing get in the way,
there's a solution! You can install and use the app right from your
desktop computer!
What is WhatsApp?
WhatsApp is a free messenger designed to be used on smartphones. It
works over the internet and allows you to talk to any person living
anywhere on planet Earth provided that you know their cellphone number.
The app is designed for Nokia Symbian, iPhone, Android and Windows
Phone devices and it’s completely free to use for the first year. Don’t
let that last line bother you, since there are ways to get it for an
unlimited time.
I did not mention PC or Mac in the supported platforms because this app is not officially available on them. But the title wasn’t misleading since we got it running on a PC and Mac.
What will I need?
The tools or rather software that you need is a simple Android emulator for PC/Mac. The one we’ll be using is the well-known Bluestacks App Player you can download from the link provided below.
And yes, WhatsApp will need your cell-number so you better make sure you have one.
Your system must have a 1GB+ RAM for running the emulator. Good graphics card and processor will obviously result in better rendering but a simple one would also do. Mac OS X or PC with XP SP3, Vista, 7 and 8 are supported.
Let’s Begin…
The steps shown below work for both PC and Mac. Just make sure you download the correct version of Bluestacks.
- First up, download and install Bluestacks app player. It’s a straight forward installation. However it might want to download extra stuff so your internet connection better be working
- Run the player from the desktop icon. You’ll get to a screen similar to the one shown below
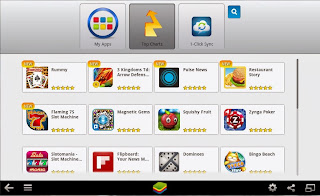
- Click on the Search icon and enter WhatsApp
- Select WhatsApp Messenger from the list and proceed to the installation. It might also ask you for a Google account, just provide that right away. Since it is an Android emulator, you’ll be navigated to Google Play. Click Install and it’ll start the download.
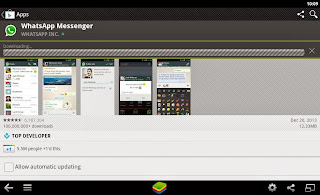
- And that’s it! WhatsApp will ask you to enter a valid phone number. The verification will also work through that number so you better enter it correctly.
- Great! Now you can use WhatsApp the way you do it on a smartphone. You can customize your profile, contact all your friends regardless of which platform they are running the app on and also get live notifications of new messages from the emulator.

You can open up the app form the My Apps category in the main screen.
So why WhatsApp?
There are several other such messenger services available on the same
platforms. You have Viber, Wechat, Kik and whatnot. Firstly, WhatsApp is
the most popular app of the lot. Secondly, WhatsApp has got everything -
you can communicate text, images or even high quality videos with
friends. Plus, it’s simple and easy to use. And if your one-year free
license expires, you can always reinstall the app to get it back.
WhatsApp is not officially released for PC/Mac but there are ways like the one mentioned above that make that happen. The methodology is simple but works quite well. WhatsApp is also the best of its kind which makes it a must-have. Just in case you were wondering throughout this tutorial, YES you can run any android app/game on the software mentioned. Guess your life just got better, much better!
WhatsApp is not officially released for PC/Mac but there are ways like the one mentioned above that make that happen. The methodology is simple but works quite well. WhatsApp is also the best of its kind which makes it a must-have. Just in case you were wondering throughout this tutorial, YES you can run any android app/game on the software mentioned. Guess your life just got better, much better!
Comments